Notebooks
Overview
Jupyter and Zeppelin notebooks are sophisticated development environments that allow you to create executable documents. These documents can run Bash commands, Python code, Spark sessions, SQL queries on various databases or metastores, and much more. They also support the dynamic generation of charts, enabling you to visualize data effectively while documenting your work using Markdown or HTML. Furthermore, you can execute the document incrementally, block by block, allowing readers to observe how the code functions in real time.
In Ilum, both Jupyter and Zeppelin can be seamlessly deployed with a single command and are automatically integrated with Ilum Services. More details are provided below.
Example
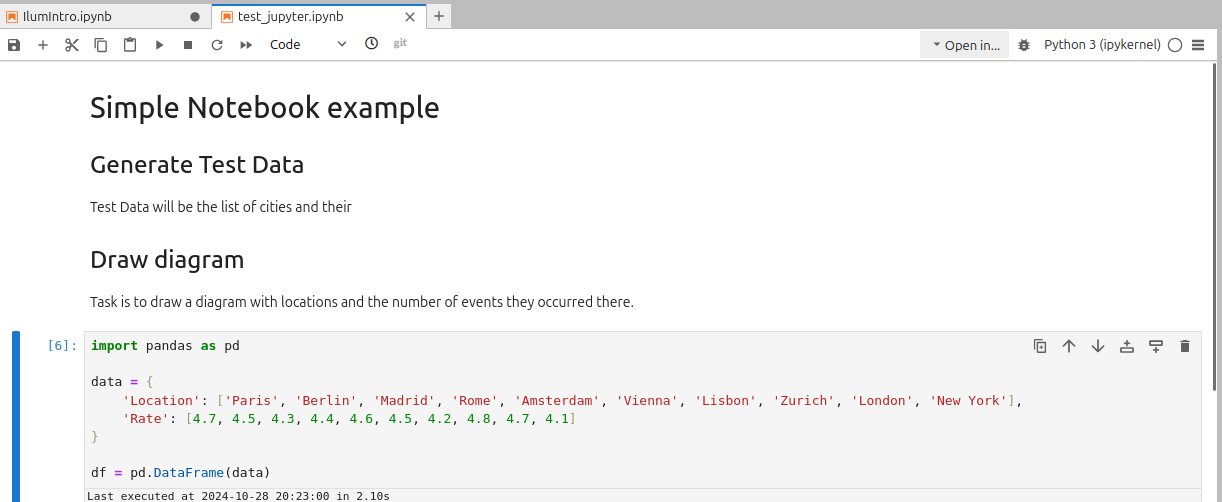
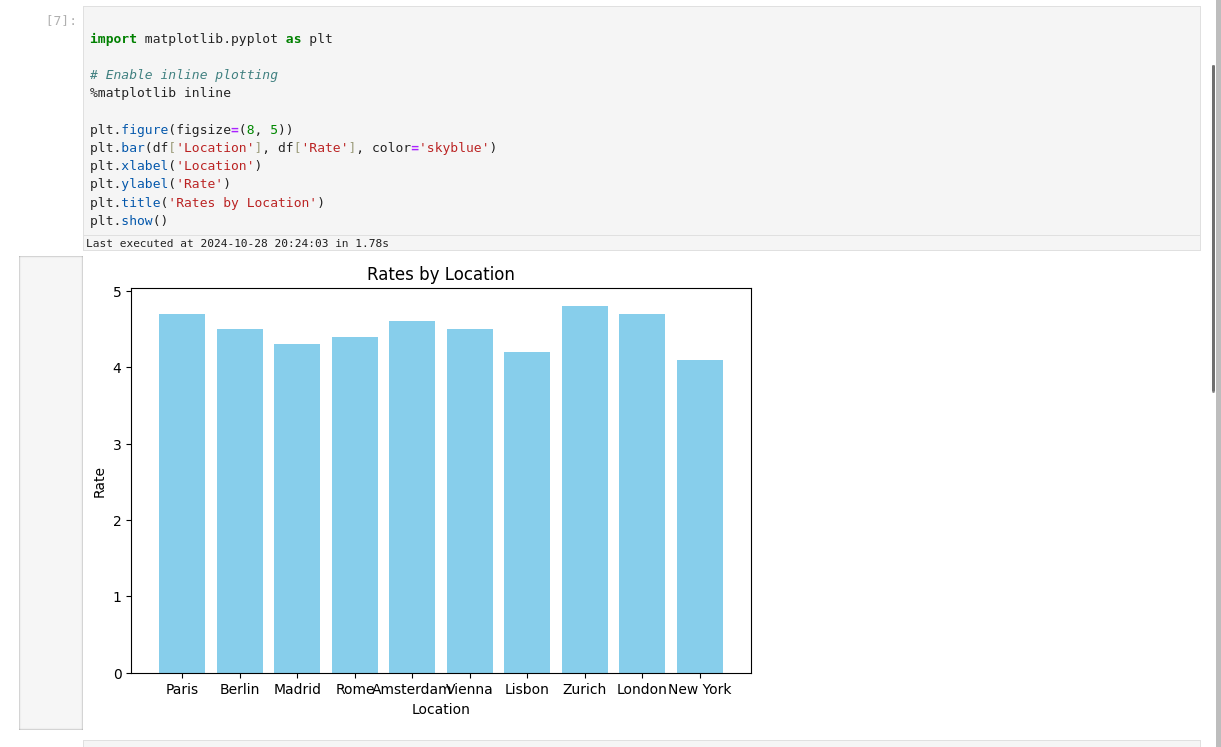
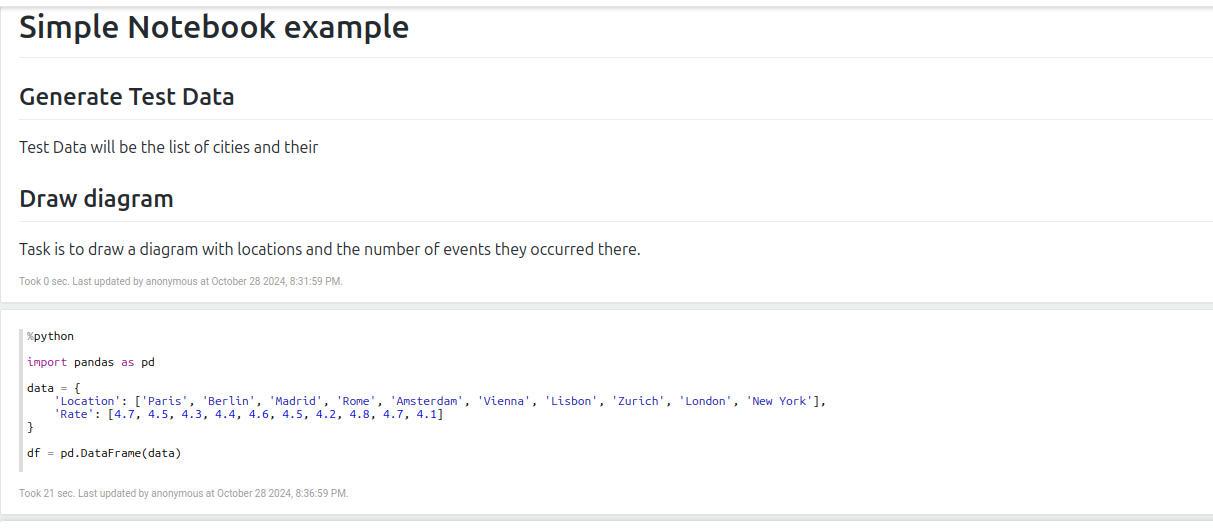
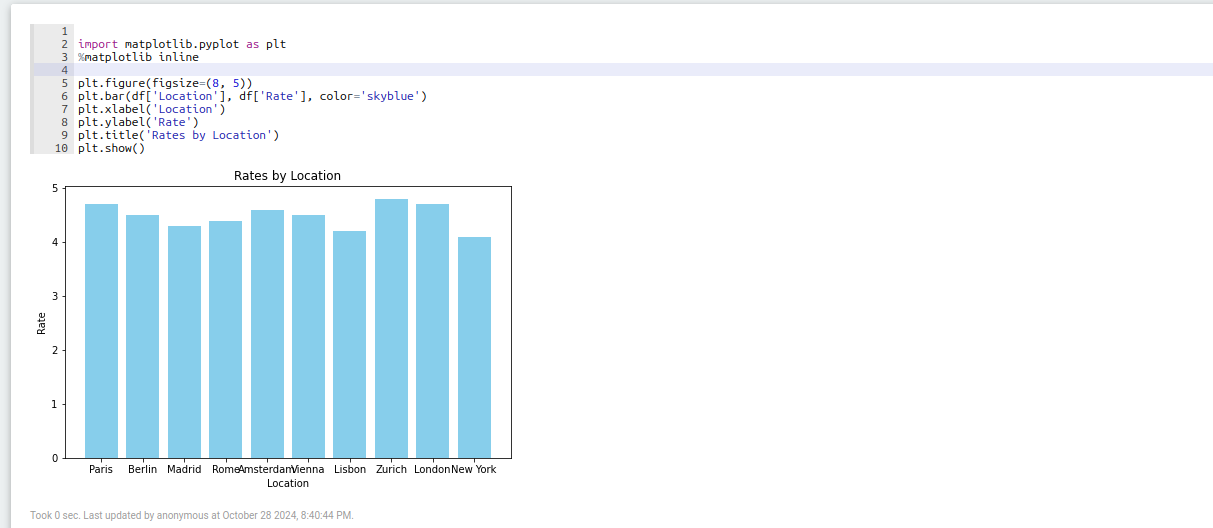
Here you can look at notebook in Jupyter and Zeppelin. It consists of 4 parts:
- Description with images written in markdown,
- Python code that generates test data
- Python code that converts data
- Dynamic Chart for data demonstration, that can me redrawn when 3 part is executed
Jupyter
Zeppelin
Ilum Integration with Notebooks via Ilum Livy Proxy
To communicate with Spark, notebooks require specific plugins.
In Jupyter, this is achieved through magic commands — special syntax expressions such as %%magic or %magic that alter a code block's behavior. For example, %%spark enables Spark magic, allowing the block to execute Spark code using the Ilum Code Service.
Zeppelin, on the other hand, has a different architecture. It uses interpreters to process code in each block, with each interpreter designed for a specific language or service. For Spark, Zeppelin uses a dedicated Spark interpreter.
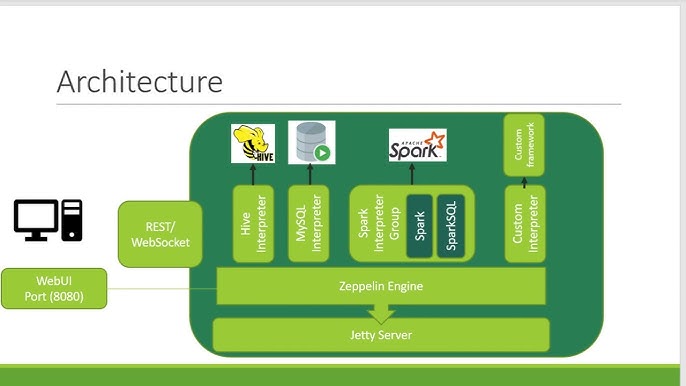
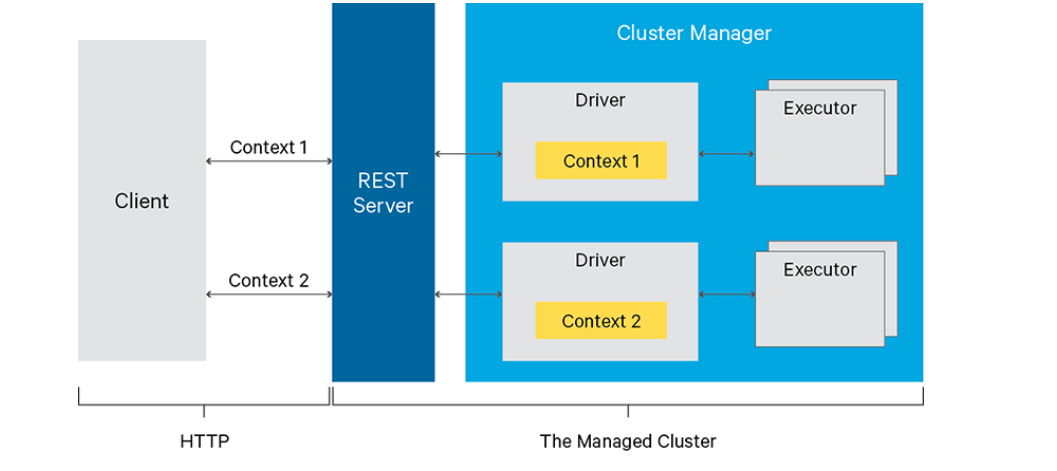
But how does Ilum connect Jupyter’s Spark magic and Zeppelin’s interpreters to manage jobs and organize them into meaningful groups? It does it by utilizing Livy Server with Proxy over it.
Many services, including Jupyter with its Spark Magic and Zeppelin with its Livy Engine, leverage Livy for communication with Spark. Livy is a server that provides a REST API for interacting with Spark.
Ilum provides its own implementation of Livy API called Ilum-Livy-Proxy that bounds Spark sessions with Ilum Services. For instance, if you create a Livy session in Jupyter, you will see a corresponding code service within your Ilum workload.
Deployment
Ilum Livy Proxy
Ilum Livy Proxy is required for communication between Notebooks and Ilum Core.
It is enabled by default and preconfigured automatically.
In case it is disabled, you can enable it like this:
helm upgrade \
    --set ilum-livy-proxy.enabled=true \
    --reuse-values \
    ilum ilum/ilum
For custom helm chart configuration, visit ilum-livy-proxy page
Jupyter
Jupyter is enabled by default and preconfigured for you automatically, including configurations required for use of Ilum Livy Proxy in spark magic. In case it is disabled you can enable it using command:
helm upgrade \
    --set ilum-jupyter.enabled=true \
    --reuse-values \
    ilum ilum/ilum
With helm you can configure resources usage, spark magic kernels and more. For details look for ilum-jupyter helm chart.
From the start it includes spark and pyspark kernels and 5 documents with detailed explanation on how to work with Ilum and Spark in Jupyter
Zeppelin
Zeppelin is preconfigured automatically, including usage of Livy Proxy for its Livy engine. However it is not enabled by default. To enable it use command:
helm upgrade \
    --set ilum-zeppelin.enabled=true \
    --reuse-values \
    ilum ilum/ilum
After that you need to create ingress or port-forward your ilum-zeppeling like this:
kubectl port-forward svc/ilum-zeppelin 8080:8080
With helm you can configure resources usage, ingress and more. For details look fo ilum-zeppelin helm chart.
Guide on Jupyter
Overview
To begin, let’s clearly distinguish between the Jupyter server environment and the Spark environment. When you run a simple Python cell in Jupyter, it is executed by default on the Jupyter server. Therefore, if you create a Spark session within a standard code cell, you will only create a local Spark session on the Jupyter server.
To leverage Ilum when working with Spark in Jupyter, you should use Spark magic. Spark magic is a plugin that enables you to execute code not locally but on a remote cluster. In Ilum, this allows you to create Scala or Python code services and execute your code there directly through Jupyter. Spark magic operates using the Livy API, which manages Spark sessions remotely via HTTP requests. In Ilum, the Livy API has been customized to replace Spark sessions with Ilum Code Services, enabling Jupyter users to access all of Ilum’s functionalities directly from their notebooks.
Jupyter provides three kernels, offering three different ways to work with Spark in Jupyter:
- Python Kernel: The default Jupyter kernel, which runs Python code on the Jupyter server.
- PySpark Kernel: A Spark kernel that runs your Python code on a remote Spark cluster.
- Spark Kernel: A Scala kernel that runs your Scala code on a remote Spark cluster.
In this guide, we will cover workflows for each of these kernels.
Python Kernel
- Spark Session management
The Python kernel executes its code on the Jupyter server by default. To run code on a remote Spark cluster, you need to include the sparkmagic plugin in your notebook. To do this, create a cell with the following code:
%load_ext sparkmagic.magics
and run it one time.
After including the sparkmagic plugin, you need to create a Spark session on the remote cluster. This can be done using the management panel. To access the panel, create a cell with the following code:
%manage_spark
and execute it. Then you will see this panel:


Using the panel, you can perform the following tasks:
-
Add and Manage Endpoints: Spark magic uses the Livy API to communicate with the Spark cluster. In this section, you can provide endpoints for Livy servers. However, Ilum comes preconfigured with the Ilum-Livy-Proxy endpoint, which is used by Spark magic to launch Ilum Code Services. It is recommended to use this preconfigured endpoint for seamless integration.
-
Create a Session: To create a session, provide a name for your session, select a language (Scala or Python), and specify Spark parameters in the Properties field. Finally, click Create Session. Once the session is created, navigate to the Ilum Workloads page to view the newly created code service. The code service will have a name starting with ilum-livy-proxy-session.

- Manage Sessions: This section displays all available sessions, including their ID, name, state, and kernel (e.g., pyspark for Python, spark for Scala). You can also delete sessions here once you’ve finished working with them.
All the documents on your Jupyter server share the sessions you create. When running a Spark cell in the Python kernel and having multiple sessions active, you must specify which Spark session to use.
Using Ilum Code Services instead of sessions offers several advantages. Ilum automatically preconfigures all Jupyter sessions to integrate seamlessly with your infrastructure modules. For example sessions are preconfigured to access all storage linked to the default cluster. If the corresponding components are enabled, Spark sessions will:
- Access the Hive Metastore.
- Send data to Ilum Lineage.
- Send data to the History Server for monitoring.
- Leverage additional functionalities provided by Ilum.
And you won't need to write configurations for that manually.
- Working in Jupyter
After setting up, to execute your code within the Ilum Code Service, you should use the %%spark magic command. This magic command allows you to run your code in the remote Spark environment managed by Ilum.
Within this environment, you can access all the variables created there, as well as the following Spark contexts:
- sc (SparkContext)
- sqlContext (HiveContext)
- spark (SparkSession)
This setup ensures seamless interaction with Spark resources and any configurations provided by the Ilum platform.
Python example:
%%spark

data = [
    (1, "n1-standard-1", 20.5, 32.1, 15.0),
    (2, "n1-standard-1", 30.0, 64.3, 20.0),
    (3, "n1-standard-2", 30.2, 16.0, 22.0),
    (4, "n1-standard-2", 45.1, 128.5, 40.2),
    (5, "e2-medium", 25.4, 8.0, 18.3),
    (6, "e2-medium", 25.3, 12.0, 10.2),
    (7, "e2-standard-2", 29.8, 24.5, 14.7),
    (8, "e2-standard-2", 35.0, 24.5, 20.5),
    (9, "n2-highcpu-4", 50.2, 64.0, 30.4),
    (10, "n2-highcpu-4", 55.1, 16.0, 35.4),
    (11, "n1-standard-8", 80.5, 32.0, 45.6),
    (12, "n1-standard-16", 95.1, 128.0, 60.0),
    (13, "n1-standard-8", 85.0, 256.0, 90.0),
    (14, "n1-highmem-2", 40.1, 128.0, 50.0),
    (15, "t2a-standard-1", 15.2, 2.0, 5.5),
    (16, "t2a-standard-2", 25.5, 4.0, 7.3),
    (17, "n1-highmem-2", 60.5, 256.0, 100.0),
    (18, "c2-standard-16", 99.9, 6240.0, 120.5),
    (19, "a2-highgpu-1g", 89.2, 256.0, 95.4),
    (20, "a2-highgpu-1g", 100.0, 40.0, 110.0),
]

#using spark context
rdd = sc.parallelize(data)

datapath = "s3a://ilum-files/data/performance"
rdd.saveAsTextFile(datapath)


#using spark session
df = spark.read.csv(datapath)
df.createOrReplaceTempView("MachinesTemp")
result = spark.sql("Select \
    _c0 as machine_id, \
    _c1 as machine_type, \
    _c2 as cpu_usage, \
    _c3 as memory_usage, \
    _c4 as time_spent \
From MachinesTemp")

result.createOrReplaceTempView("MachineStats")

result.show()
Scala example:
%%spark
val data = Seq(
  (1, "n1-standard-1", 20.5, 32.1, 15.0),
  (2, "n1-standard-1", 30.0, 64.3, 20.0),
  (3, "n1-standard-2", 30.2, 16.0, 22.0),
  (4, "n1-standard-2", 45.1, 128.5, 40.2),
  (5, "e2-medium", 25.4, 8.0, 18.3),
  (6, "e2-medium", 25.3, 12.0, 10.2),
  (7, "e2-standard-2", 29.8, 24.5, 14.7),
  (8, "e2-standard-2", 35.0, 24.5, 20.5),
  (9, "n2-highcpu-4", 50.2, 64.0, 30.4),
  (10, "n2-highcpu-4", 55.1, 16.0, 35.4),
  (11, "n1-standard-8", 80.5, 32.0, 45.6),
  (12, "n1-standard-16", 95.1, 128.0, 60.0),
  (13, "n1-standard-8", 85.0, 256.0, 90.0),
  (14, "n1-highmem-2", 40.1, 128.0, 50.0),
  (15, "t2a-standard-1", 15.2, 2.0, 5.5),
  (16, "t2a-standard-2", 25.5, 4.0, 7.3),
  (17, "n1-highmem-2", 60.5, 256.0, 100.0),
  (18, "c2-standard-16", 99.9, 6240.0, 120.5),
  (19, "a2-highgpu-1g", 89.2, 256.0, 95.4),
  (20, "a2-highgpu-1g", 100.0, 40.0, 110.0)
)

//using spark context
val rdd = spark.sparkContext.parallelize(data)

val datapath = "s3a://ilum-files/data/performance"
rdd.saveAsTextFile(datapath)

//using spark session
val df = spark.read.option("header", "false").csv(datapath)

df.createOrReplaceTempView("MachinesTemp")

val result = spark.sql("""
  SELECT
    _c0 AS machine_id,
    _c1 AS machine_type,
    _c2 AS cpu_usage,
    _c3 AS memory_usage,
    _c4 AS time_spent
  FROM MachinesTemp
""")


result.createOrReplaceTempView("MachineStats")

result.show()
You can switch between sessions in your cells using -s flag and name of the session you want to choose.
%%spark -s SESSION_NAME

#your python spark code
# ...
For example if you have this session list:

Where mysession is of spark type which uses scala language. This means that if you want to use this scala spark session you have to choose the session like this:
%%spark -s scalasession
pythonsessions is of type pyspark which uses python language. This means that if you want to use python spark session you have to choose the session like this
%%spark -s pythonsession
You can launch sql queries in your spark catalog by using %%spark magic with -c sql:
%%spark -c sql
SELECT * FROM MachineStats
You can use multiple flags with the SQL command in the Ilum Code Service environment:
- -o: Specifies the local environment variable that will store the result of the query. This is the best solution for passing data between sessions.
- -n or --maxrows: Defines the maximum number of rows to return from the query.
- -q or --quiet: Determines whether to display the output in the document. If specified, the result will not be shown.
- -f or --samplefraction: Sets the fraction of the result to return when sampling.
- -m or --samplemethod: Specifies the sampling method to use, either take or sample.
These flags provide flexibility in managing query results and controlling the output behavior when working with Spark in the Ilum environment.
For example:
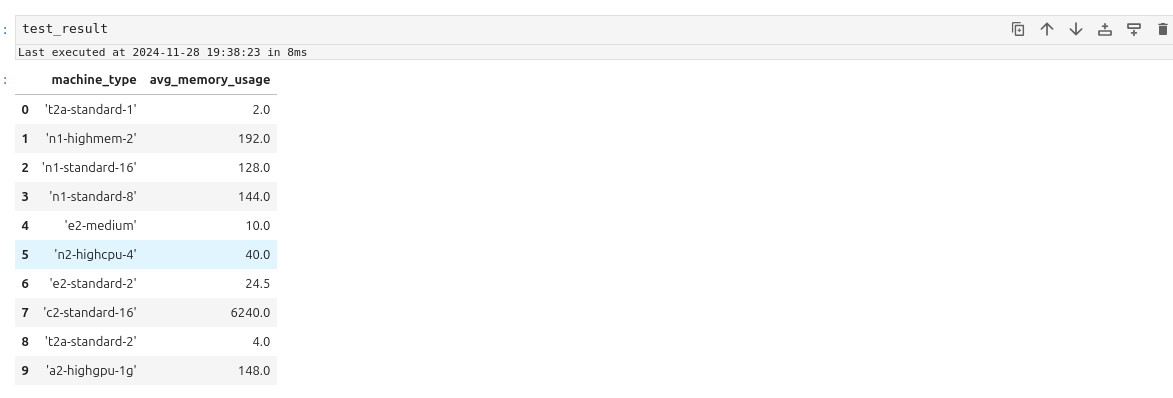
%%spark -s pythonsession -c sql -o test_result -q --maxrows 10
SELECT machine_type, Avg(memory_usage) as avg_memory_usage from MachineStats Group by machine_type
test_result
The result should look like this:
- Displaying data
PySpark and Spark sessions often have compatibility issues with advanced visualization packages. A practical solution is to transfer the data to a local IPython kernel for processing and visualization. Here's how to achieve this:
- Export Data to Local Kernel: Use the -o variable in your notebook or code to pass data from Spark to the local IPython kernel.
%%spark -c sql -o machine_stats
SELECT * FROM MachineStats
- Install Required Visualization Packages: Install any necessary Python visualization libraries using the command:
!pip install package
For example let's display data by using autovizwidget widget:
from autovizwidget.widget.utils import display_dataframe
display_dataframe(machine_stats)
It allows to display data as one of the charts below:
- Bars
- Pie
- Scatter
- Area
- Table
- Line
- Cleaning sessions You can clean up your Spark sessions in two ways:
-
Via the Spark Sessions Management Panel: Go to the Manage Sessions section, and click Delete next to the session you want to remove.
-
Via the Spark Sessions Management Panel's Manage Endpoints Section: Navigate to the Manage Endpoints section, and click the Clean Up button next to the Ilum Livy Proxy endpoint.
These options allow you to remove unnecessary or inactive sessions from your environment.
Spark and PySpark Kernels
The Spark and PySpark kernels execute your code directly within the Spark session. In Ilum, when you create a new PySpark or Spark document, a corresponding Python or Scala Code Service is also created and assigned to the document. Your code will run within these services, meaning the Spark session is preconfigured and fully integrated with all components of the system.
For example, if the following modules are enabled, your Spark session will:
- Have access to the Hive Metastore
- Have access to the storages linked to the default cluster.
- Send data about memory usage, CPU usage, and stages schema to the History Server.
- Forward logs to Loki using Promtail.
- Expose its metrics to Prometheus.
The main difference between the PySpark and Spark kernels lies in the programming language:
- PySpark Kernel: Uses Python.
- Spark Kernel: Uses Scala.
The magic commands you can use and the overall workflow remain largely similar between the two kernels.
- Session Creation
To create a PySpark or Spark document go to Jupyter, click on the + button at the top left corner and choose the kernel
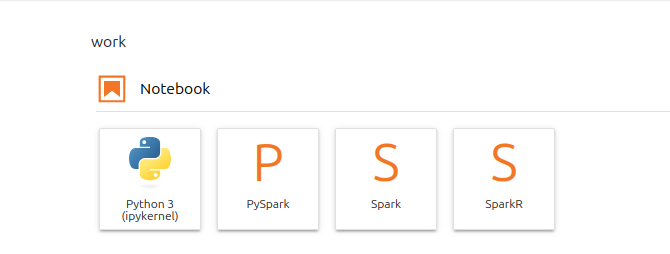
Then create a cell, type something simple there and run it.
For example:
print("Hello")
After some time, you should see the following result:

If you navigate to the Workloads page, you will see a new Code Service created in the default cluster. This Code Service will have a name prefixed with ilum-livy-proxy-session, indicating it is associated with the Spark or PySpark session you just created.

Notice that the code in the cell was executed as a request to that code service.
- Session Management
Spark and PySpark kernels do not have management panel similar to sparkmagics. However you can use magic commands for the same functionality.
Use %%configure magic to set spark parameters for you session using JSON format
For example, typing this code into your cell:
%%configure -f
{
  "spark.sql.extensions":"io.delta.sql.DeltaSparkSessionExtension",
  "spark.sql.catalog.spark_catalog": "org.apache.spark.sql.delta.catalog.DeltaCatalog",
  "spark.databricks.delta.catalog.update.enabled": true
}
will enable Delta in your spark session
It is mandatory to use -f flag because it forces Ilum to restart the session in case it is already running
Use %%info magic to get information about active spark sessions in Livy.

Use %%delete -f -s ID to delete sessions by their id. You cannot delete session of the current kernel
For example:
%%delete -f -s 16
Use %%cleanup -f to delete all the session in the current endpoint (in Ilum Livy Proxy)
Use %%logs to get the logs related to the spark session. You can use them for debugging.
- Workflow
If you want to write a Spark program, you don’t need to use any magics. Simply type your code into a cell and execute it.
For in PySpark Kernel (python):
data = [
    (1, "n1-standard-1", 20.5, 32.1, 15.0),
    (2, "n1-standard-1", 30.0, 64.3, 20.0),
    (3, "n1-standard-2", 30.2, 16.0, 22.0),
    (4, "n1-standard-2", 45.1, 128.5, 40.2),
    (5, "e2-medium", 25.4, 8.0, 18.3),
    (6, "e2-medium", 25.3, 12.0, 10.2),
    (7, "e2-standard-2", 29.8, 24.5, 14.7),
    (8, "e2-standard-2", 35.0, 24.5, 20.5),
    (9, "n2-highcpu-4", 50.2, 64.0, 30.4),
    (10, "n2-highcpu-4", 55.1, 16.0, 35.4),
    (11, "n1-standard-8", 80.5, 32.0, 45.6),
    (12, "n1-standard-16", 95.1, 128.0, 60.0),
    (13, "n1-standard-8", 85.0, 256.0, 90.0),
    (14, "n1-highmem-2", 40.1, 128.0, 50.0),
    (15, "t2a-standard-1", 15.2, 2.0, 5.5),
    (16, "t2a-standard-2", 25.5, 4.0, 7.3),
    (17, "n1-highmem-2", 60.5, 256.0, 100.0),
    (18, "c2-standard-16", 99.9, 6240.0, 120.5),
    (19, "a2-highgpu-1g", 89.2, 256.0, 95.4),
    (20, "a2-highgpu-1g", 100.0, 40.0, 110.0),
]

#using spark context
rdd = sc.parallelize(data)

datapath = "s3a://ilum-files/data/performance"
rdd.saveAsTextFile(datapath)


#using spark session
df = spark.read.csv(datapath)
df.createOrReplaceTempView("MachinesTemp")
result = spark.sql("Select \
    _c0 as machine_id, \
    _c1 as machine_type, \
    _c2 as cpu_usage, \
    _c3 as memory_usage, \
    _c4 as time_spent \
From MachinesTemp")

result.createOrReplaceTempView("MachineStats")

result.show()
In Spark Kernel (Scala):
val data = Seq(
  (1, "n1-standard-1", 20.5, 32.1, 15.0),
  (2, "n1-standard-1", 30.0, 64.3, 20.0),
  (3, "n1-standard-2", 30.2, 16.0, 22.0),
  (4, "n1-standard-2", 45.1, 128.5, 40.2),
  (5, "e2-medium", 25.4, 8.0, 18.3),
  (6, "e2-medium", 25.3, 12.0, 10.2),
  (7, "e2-standard-2", 29.8, 24.5, 14.7),
  (8, "e2-standard-2", 35.0, 24.5, 20.5),
  (9, "n2-highcpu-4", 50.2, 64.0, 30.4),
  (10, "n2-highcpu-4", 55.1, 16.0, 35.4),
  (11, "n1-standard-8", 80.5, 32.0, 45.6),
  (12, "n1-standard-16", 95.1, 128.0, 60.0),
  (13, "n1-standard-8", 85.0, 256.0, 90.0),
  (14, "n1-highmem-2", 40.1, 128.0, 50.0),
  (15, "t2a-standard-1", 15.2, 2.0, 5.5),
  (16, "t2a-standard-2", 25.5, 4.0, 7.3),
  (17, "n1-highmem-2", 60.5, 256.0, 100.0),
  (18, "c2-standard-16", 99.9, 6240.0, 120.5),
  (19, "a2-highgpu-1g", 89.2, 256.0, 95.4),
  (20, "a2-highgpu-1g", 100.0, 40.0, 110.0)
)

val rdd = spark.sparkContext.parallelize(data)

val datapath = "s3a://ilum-files/data/performance"
rdd.saveAsTextFile(datapath)

val df = spark.read.option("header", "false").csv(datapath)

df.createOrReplaceTempView("MachinesTemp")

val result = spark.sql("""
  SELECT
    _c0 AS machine_id,
    _c1 AS machine_type,
    _c2 AS cpu_usage,
    _c3 AS memory_usage,
    _c4 AS time_spent
  FROM MachinesTemp
""")


result.createOrReplaceTempView("MachineStats")

result.show()
To use Spark SQL, you can utilize the %%sql magic command, which functions similarly to how it works in the Python kernel with Spark magic.
For exapmle:
%%sql
SELECT * FROM MachineStats
You can also use multiple flags with %%sql to customize its behavior:
-o: Specifies the local environment variable that will store the result of the query.-nor--maxrows: Sets the maximum number of rows to return from the query.-qor--quiet: Controls whether the output is displayed in the document. If specified, the result will not be shown.-for--samplefraction: Defines the fraction of the result set to return when sampling.-mor--samplemethod: Specifies the sampling method to use—either take or sample.
For example:
%%sql -o test_result -q --maxrows 10
SELECT machine_type, Avg(memory_usage) as avg_memory_usage from MachineStats Group by machine_type
You won't see any results running this cell, but they will be saved in the test_result vairable locally and can be retrieved using
%%local magic:
%%local
test_result
The %%local magic command is used to execute code in a local environment. This can be useful when you don’t want to occupy the Spark environment for tasks that don’t require its resources.
In case you want to use a value from local environment in the spark session you should use %%send_to_spark magic.
%%send_to_spark -i value -n name -t type
Here you specify the value that you want send, its data type and the name of variable that it will be assigned to in the spark session.
For example:
%%local
s = u"abc ሴ def"
%%send_to_spark -i s -n s -t str
print(s)
Running these 3 cells should print the s string.
- Displaying data
In Spark and PySpark kernel dataframes retrieved with SQL commands or pandas dataframes can be displayed as
- table
- pie
- bars
- line chart
- scatter
- area
For example:
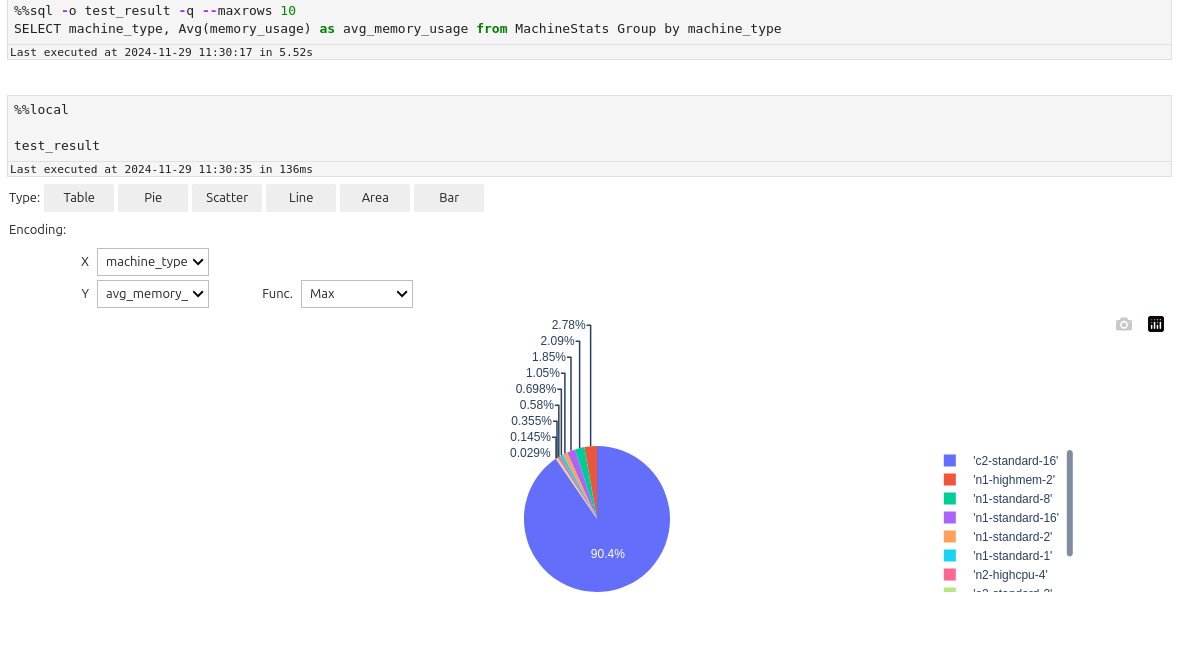
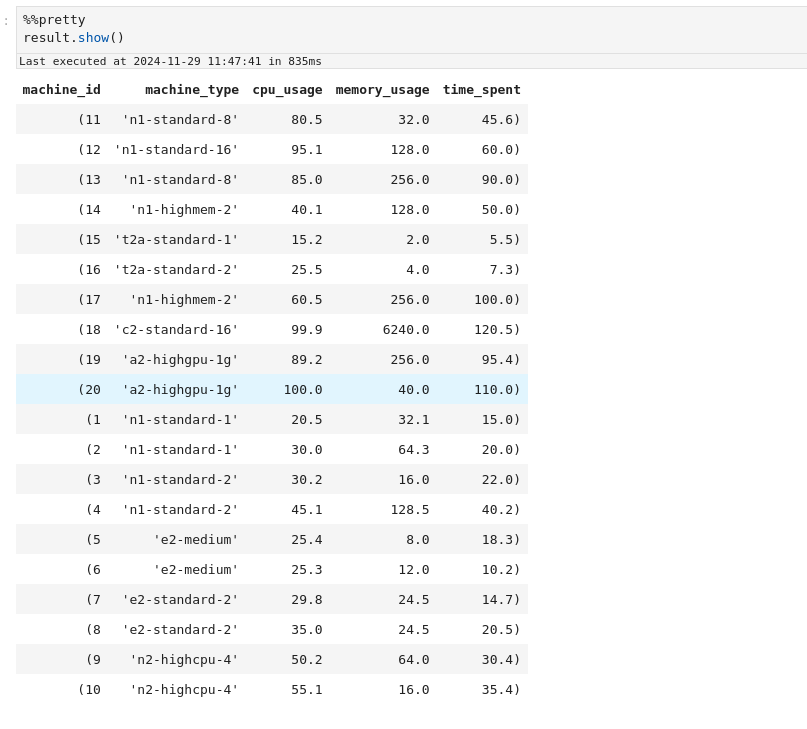
For spark dataframes you can use %%pretty magic to display them in a more pleasent format:
%%pretty
result.show()
Guide on Zeppelin
In Zeppelin you cannot control spark sessions, they are created and managed automatically. By default for each notebook
there is one separate for %livy.spark, one for %livy.pyspark and one for %livy.sql. In interpreter configurations
you can change this.
1. Create notebook with Livy engine
As mentioned earlier, Ilum uses Ilum-Livy-Proxy to link spark session from Zeppelin with Ilum Service. Therefore you must choose Livy engines when working with spark.
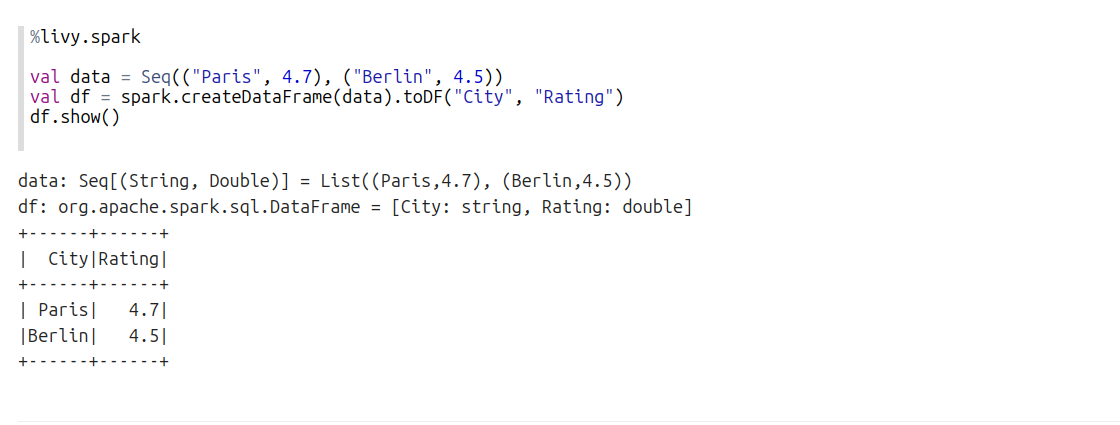
2. Write spark code in scala
Use %livy.spark
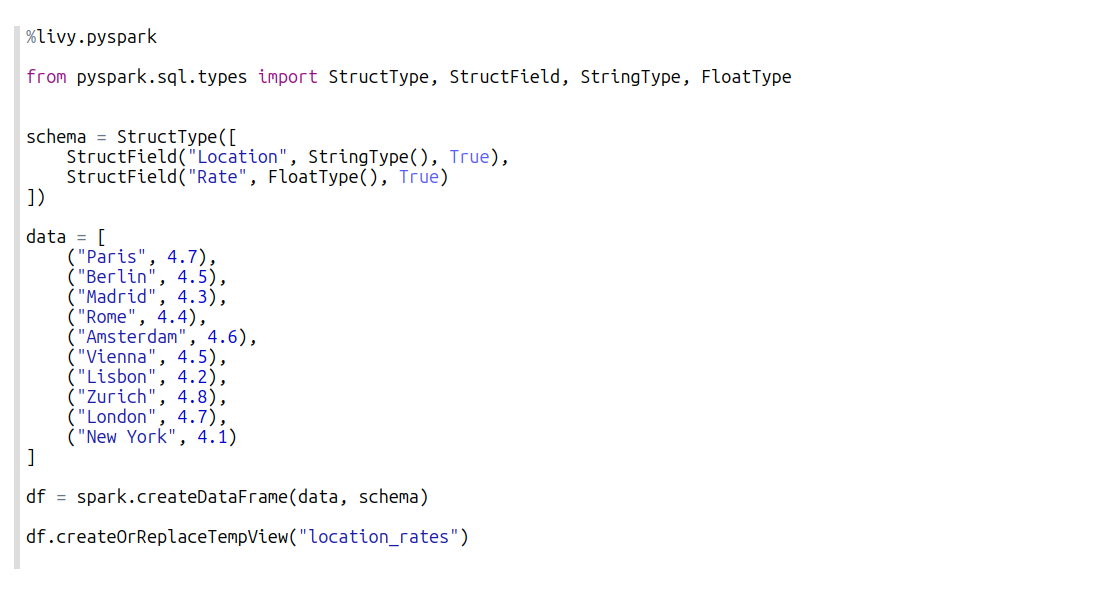
3. Write spark code in pyspark
Use %livy.pyspark
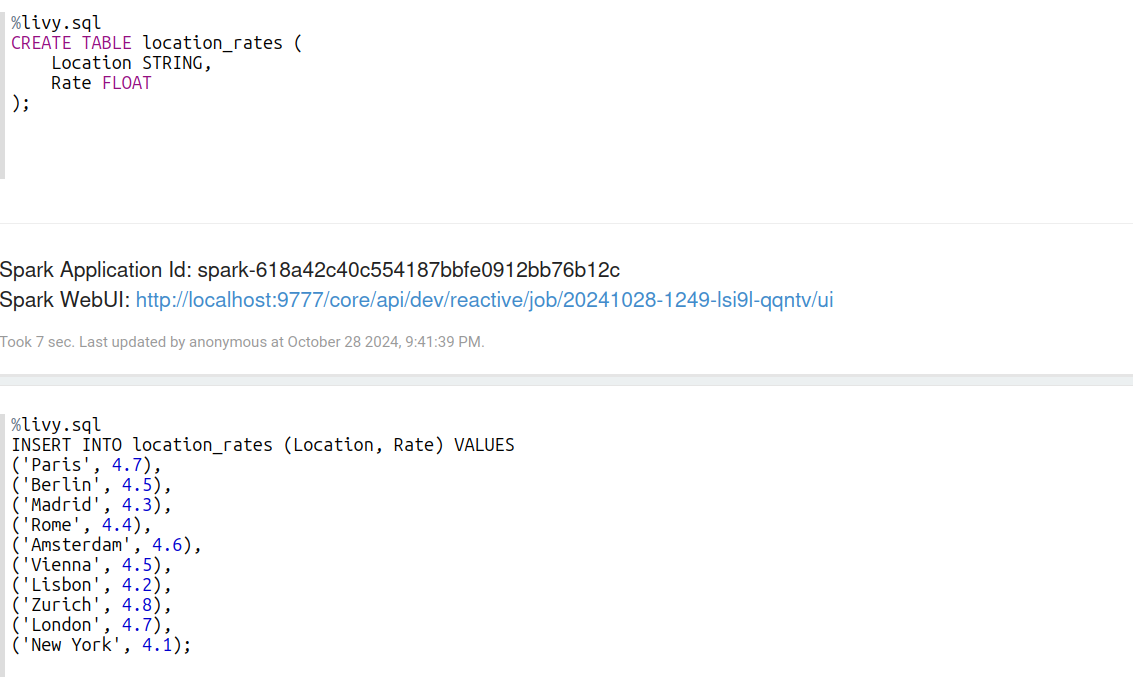
4. Write spark sql statements
Use %livy.sql
5. Make use of built-in visualisztions
When you run sql statements that return rows, you can visualize them

6. Manage sessions lifecycle
Unfortunately zeppelin is not flexible in session management. However you can:
- Manually finish ilum service in blocks:
spark.stop()
- Set timeout for idle sessions in interpreter configurations:
zeppelin.livy.idle.timeout=300