Get Started
This guide will walk you through the process of setting up and running your first Spark job with Ilum on a Kubernetes cluster.
Prerequisites
In order to run Ilum on your machine, you'll need the following:
Kubernetes Cluster
Throughout this guide we'll be using Minikube. It is a tool that makes it easy to run Kubernetes locally. If you don't have Minikube installed, you can find instructions on how to install it here.
It is enough to be able to successfully run the minikube start command.
Issues with Minikube on Windows OS
If you are using Windows, you may encounter issues with Minikube related to the driver.
On Windows, Minikube can choose from a variety of drivers (hosts for the Kubernetes cluster), however generally you want to use either Hyper-V or Docker. If you have Docker installed, you should either use Minikube with the Docker driver or enable built-in Kubernetes support in Docker Desktop.
If you do not have Docker available, you should use the Hyper-V driver. To do this, you can consult this guide. Keep in mind that you will need to give Minikube administrator privileges to interface with Hyper-V.
Helm
Helm is a package manager for Kubernetes that allows you to define, install, and upgrade Kubernetes applications. If you haven't installed Helm yet, you can find instructions here.
Setting Up Minikube
In order to run Ilum, you'll need to set up Minikube in a way that provides enough resources for the Spark jobs to run.
This command will launch Minikube cluster with 6 CPU threads available, 12GB of memory and the metrics-server addon, which will allow you to view the cluster's resource usage inside the Ilum UI:
minikube start --cpus 6 --memory 12288 --addons metrics-server
Installing Ilum
Once your Kubernetes cluster is up and running, you can install Ilum by adding the Ilum Helm chart repository and then installing Ilum using Helm:
helm repo add ilum https://charts.ilum.cloud
helm install ilum ilum/ilum
This will install Ilum into your Kubernetes cluster. It should take around 2 minutes for Ilum to initialize.
Installation Problems
In case you have any problems related to Ilum installation, vision troubleshooting section here
Accessing the Ilum UI
After Ilum is installed, you can access the UI in several ways:
-
NodePort (enabled by default for testing)
Exposing the service via NodePort can be more convenient than port-forwarding (which may drop connections).
Access it at:http://<KUBERNETES_NODE_IP>:31777 -
Minikube
If you are using Minikube, run:minikube service ilum-ui -n ilumThis command will automatically open the service in your default browser (or display the URL) based on your Minikube IP.
-
(Not recommended) Port-forward
Port-forward the Ilum UI service to localhost on port 9777:kubectl port-forward svc/ilum-ui 9777:9777Now, you can navigate to http://localhost:9777 in your web browser to access the Ilum UI.
-
Ingress (recommended for production) We strongly recommend using an Ingress for production access. For configuration details, see Ilum Ingress Guide
In all cases, you can use the default credentials
admin:adminto log in (this is configurable via Helm).
Submitting a Spark Application on UI
Now that your Kubernetes cluster is configured to handle Spark jobs via Ilum, let's submit a Spark application. For this example, we'll use the "SparkPi" example from the Spark documentation. You can download the required jar file from this link.
Ilum will create a Spark driver pod using the Spark 3.x docker image. The number of Spark executor pods can be scaled to multiple nodes as per your requirements.

And that's it! You've successfully set up Ilum and run your first Spark job. Feel free to explore the Ilum UI and API for submitting and managing Spark applications. For traditional approaches, you can also use the familiar spark-submit command.
Interactive Spark Job with Scala/Java
Interactive jobs in Ilum are long-running sessions that can execute job instance data immediately. This is especially useful as there's no need to wait for Spark context to be initialized every time. If multiple users point to the same job ID, they will interact with the same Spark context.
To enable interactive capabilities in your existing Spark jobs, you'll need to implement a simple interface to the part of your code that needs to be interactive. Here's how you can do it:
First, add the Ilum job API dependency to your project:
Gradle
implementation 'cloud.ilum:ilum-job-api:6.3.0'
Maven
<dependency>
    <groupId>cloud.ilum</groupId>
    <artifactId>ilum-job-api</artifactId>
    <version>6.3.0</version>
</dependency>
sbt
libraryDependencies += "cloud.ilum" % "ilum-job-api" % "6.3.0"
Then, implement the Job trait/interface in your Spark job. Here's an example:
Scala
package interactive.job.example

import cloud.ilum.job.Job
import org.apache.spark.sql.SparkSession

class InteractiveJobExample extends Job {

  override def run(sparkSession: SparkSession, config: Map[String, Any]): Option[String] = {
    val userParam = config.getOrElse("userParam", "None").toString
    Some(s"Hello ${userParam}")
  }
}
Java
package interactive.job.example;

import cloud.ilum.job.Job;
import org.apache.spark.sql.SparkSession;
import scala.Option;
import scala.Some;
import scala.collection.immutable.Map;
public class InteractiveJobExample implements Job {
    @Override
    public Option<String> run(SparkSession sparkSession, Map<String, Object> config) {
        String userParam = config.getOrElse("userParam", () -> "None");
        return Some.apply("Hello " + userParam);
    }
}
In this example, the run method is overridden to accept a SparkSession and a configuration map. It retrieves a user parameter from the configuration map and returns a greeting message.
You can find a similar example on GitHub.
By following this pattern, you can transform your Spark jobs into interactive jobs that can execute calculations immediately, improving user interactivity and reducing waiting times.
Interactive Spark Job with Python
Below is an example of how to configure an interactive Spark job in Python using the ilum library:
-
Spark Image Setup
a) Use a Docker image from DockerHub
Each Spark image we provide on DockerHub already has the necessary components built in.b) Install the
ilumpackage
If, for any reason, your Docker image does not include theilumpackage or if you build your own custom image, you can install it (either within the container or locally) by running:pip install ilum -
Job Structure in
ilum
The Spark job logic is encapsulated in a class that extends IlumJob, particularly within its run method
from ilum.api import IlumJob

class PythonSparkExample(IlumJob):
    def run(self, spark, config):
        # Job logic here
Simple interactive spark pi example:
from random import random
from operator import add

from ilum.api import IlumJob


class SparkPiInteractiveExample(IlumJob):

    def run(self, spark, config):
        partitions = int(config.get('partitions', '5'))
        n = 100000 * partitions

        def is_inside_unit_circle(_: int) -> float:
            x = random() * 2 - 1
            y = random() * 2 - 1
            return 1.0 if x ** 2 + y ** 2 <= 1 else 0.0

        count = (
            spark.sparkContext.parallelize(range(1, n + 1), partitions)
            .map(is_inside_unit_circle)
            .reduce(add)
        )

        pi_approx = 4.0 * count / n
        return f"Pi is roughly {pi_approx}"
You can find a similar example on GitHub.
Submitting an Interactive Spark Job on UI
After creating a file that contains your Spark code, you will need to submit it to Ilum. Here's how you can do it:
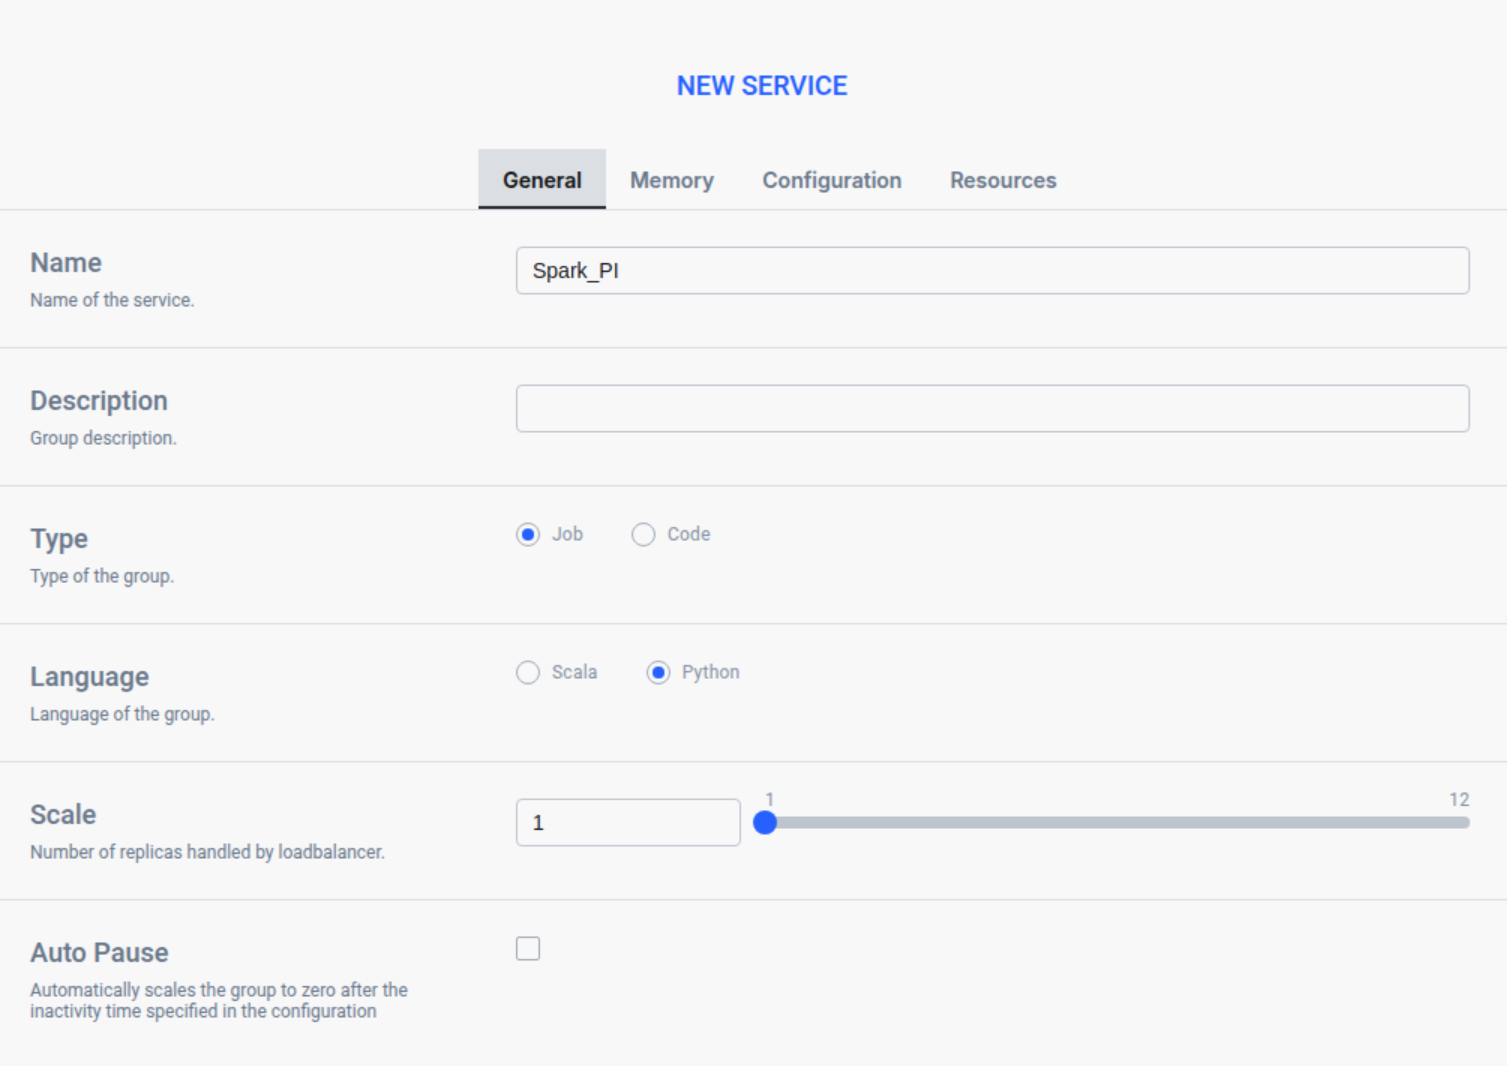
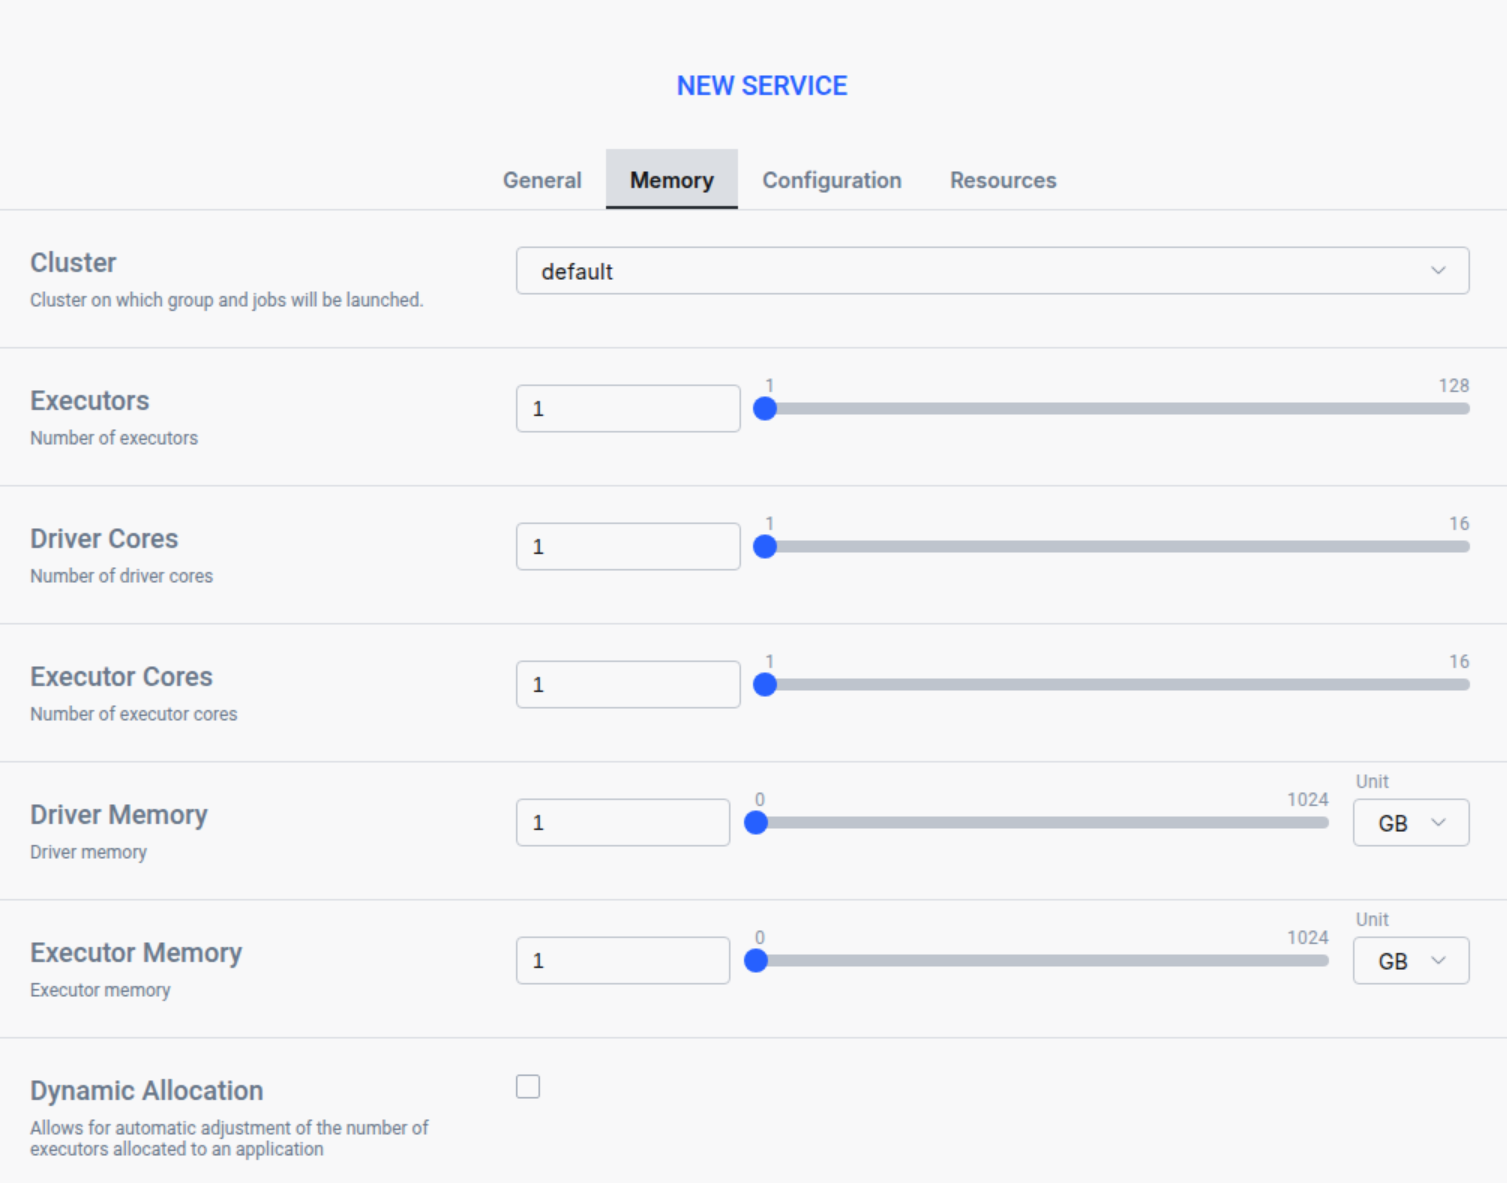
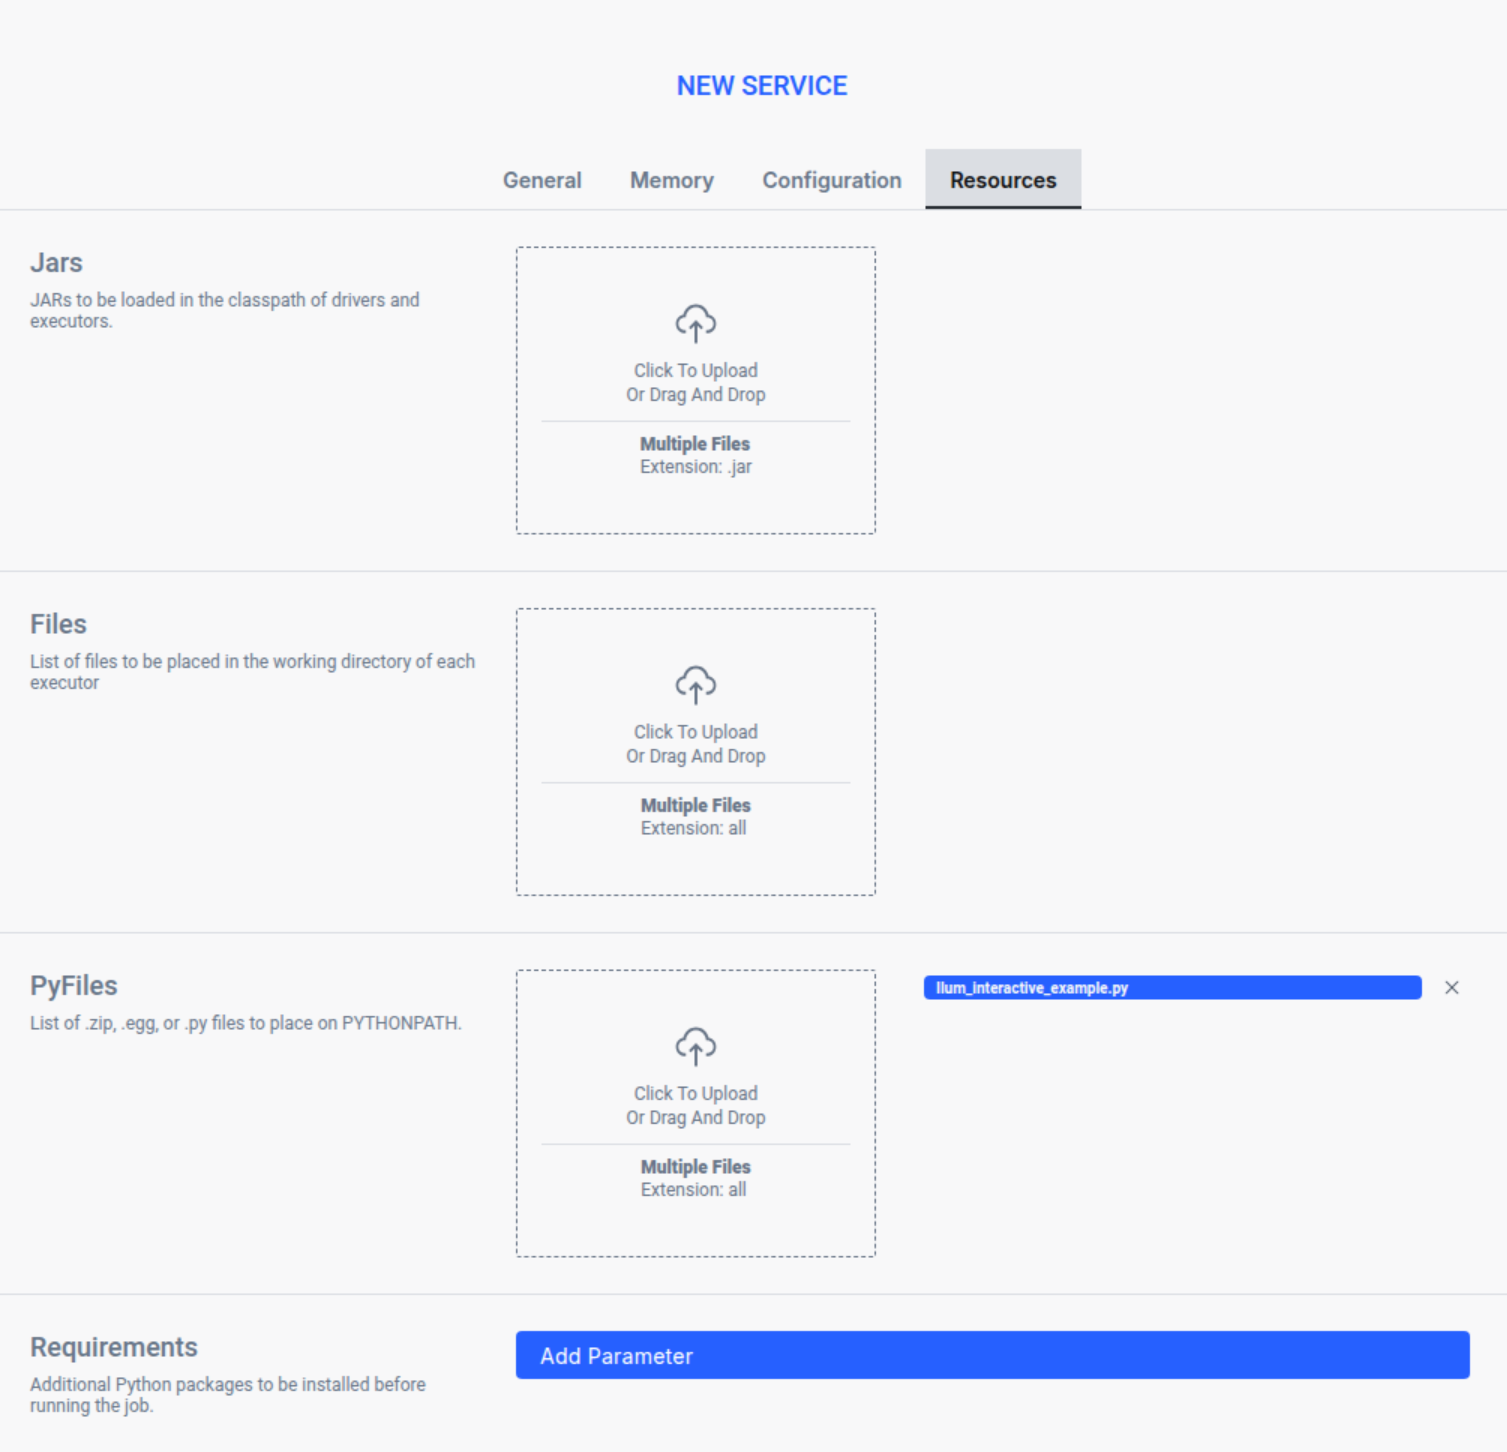
Open Ilum UI in your browser and create a new service:

In the General tab put a name of a service

In the Memory tab choose a cluster and set up your memory settings

In the Resource tab upload your spark file

Press Submit to apply your changes, and Ilum will automatically create a Spark driver pod. You can adjust the number of Spark executor pods by scaling them as needed.
Next, go to the Workloads section to locate your job. By clicking on its name, you can access its detailed view. Once the Spark container is ready, you can run the job by specifying the filename.classname and defining any optional parameters in JSON format.

Now we have to put filename.classname in the Class filed:
Ilum_interactive_spark_pi.SparkPiInteractiveExample
and define the slices parameter in JSON format:
{
  "partitions": 5
}
The first requests might take few seconds because of initialization phase, each another will be immediate.

By following these steps, you can submit and run interactive Spark jobs using Ilum. This functionality provides real-time data processing, enhances user interactivity, and reduces the time spent waiting for results.